ROUGH COUNTRY
8073 US 90
Del Rio, Texas
(by Lake Amistad)

PROPER FIELD CARE IS ESSENTIAL !
A note of caution:
Because of the various diseases that wild game can transmit to humans, always use caution when handling the carcass. Use rubber/latex gloves and wash your hands with soap and water after handling. Remember to contact your taxidermist prior to your hunt in order to get instructions on their caping requirements. However, the following techniques are generally acceptable.
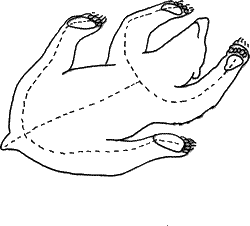
With the animal on its back, make a shallow cut through the skin below the breastbone. Start your cut away from the brisket, allowing plenty of uncut skin\for your shoulder mount. Insert two fingers of the free hand,cradling the blade, to hold the skin up. Cut straight down the belly and around the genitals, separating but not severing them from the abdominal wall.
Slit the belly skin
Note: Start th incision below the caping line. Cut Deeply around the rectum, being careful not to cut off or puncture the intestine. Pull to make sure the rectum is separated from tissue connecting it to the pelvic canal. Pull the rectum out and tie string tightly around it to prevent droppings from touching the meat. Lift the animal's back quarter a bit, reach into the front of the pelvic canal, and pull the intestine and connected rectum into the stomach area.
For a full shoulder mount, do not cut open the chest cavity. Cut the diaphragm away from the ribs all the way to the backbone. In the chest cavity find the esophagus & wind pipe, cut them off as far up as possible & pull them down through the chest. Roll the deer onto its side, grab the esophagus with one hand and the rectum with the other. Pull hard and the deer's internal organs will come out.
CAPING - SHOULDER MOUNT
With a sharp knife, slit the hide circling the body behind the shoulder at approximately the midway point of the rib cage behind the front legs.
Slit the skin around the legs just above the knees. An additional slit will be needed from the back of the leg and joining the body cut behind the legs. Peel the skin forward up to the ears and jaw exposing the head/neck junction.
Cut into the neck approximately three inches down from this junction. Circle the neck cutting down to the spinal column. After this cut is complete, grasp the antler bases, and twist the head off the neck.
This should allow the hide to be rolled up and put in a freezer until transported to the taxidermist.These cuts should allow ample hide for the taxidermist to work with in mounting.

METHODS FOR SKINNING LIFE SIZE BIG GAME
There are two major methods of skinning for a large life-size mount such as deer, elk, or bear. These methods are the flat incision and the dorsal method.
SMALL MAMMALS
Animals, coyote sized or smaller, should not be skinned and should be froze shoe until taken into your taxidermist. Do not gut the animal.
Small mammals, especially carnivores, will spoil quickly because of their thin hide and bacteria.
If you can't take the animal immediately to taxidermist, as soon as the carcass cools completely, put it in a plastic bag and freeze it.
With the epidemic of rabies evident in many areas of the country, take every safety measure necessary when handling your game.
1. THE FLAT INCISION
The flat incision is mainly used for rug mounts and for a variety of poses. Make these slits (cutting the feet free from the carcass) and pull the skin off the carcass. The head is detached as with a shoulder mount .
Note: Freeze after skinning or take to your taxidermist.
2. THE DORSAL METHOD
The dorsal method of skinning involves a long slit down the back (from the base of the tail up the spin to below joint of the neck). In this method as the carcass is skinned it is pulled through this incision.
The feet /hooves and the head are cut from the carcass as with a shoulder mount at the joints. Only use this method with approval and detailed instructions from your taxidermist.
Remember to freeze your skin quickly after skinning.

FISH
Do not gut your fish. If you cannot take your fish immediately to a taxidermist, wrap it in a very wet towel and put it in a plastic bag, making sure all the fins are flat against the fish's body (to prevent breakage) and freeze it. A fish frozen in this manner can safely be kept in the freezer for months.
Note: A fish will lose its coloration shortly after being caught. A good color photograph immediately after the catch may enable the taxidermist to duplicate the natural color tones of that particular fish.
BIRDS
Do not gut the bird. Rinse any blood from the feathers with water. Take the bird immediately to your taxidermist or freeze it.
Put the bird into a pantyhose for freezing, being careful not to damage the feathers, including the tail. If the bird's tail feathers do not fit in the hose, do not bend them. Let the tail stick out of the hose.
FINAL TIPS
Always have appropriate tags with your trophies when you take them to your taxidermist. Do not cut off the ears for attachment. Songbirds, Eagles, Hawks and Owls are protected by Federal Law and can not be mounted or harvested unless you possess a special Federal permit.For situations where you are hunting with no available taxidermist or freezer, ask your taxidermist about techniques to skin out the entire cape (including the head) and salting the hide. This is the only method in remote locations that can preserve your hide for later mounting.
This informations copyrighted by McKenzie Sports Products, Inc. and is intended to help hunters avoid common mistakes in the field.
Printing of more than one copy at a time without written permission is prohibited